All products featured are independently chosen by us. However, SoundGuys may receive a commission on orders placed through its retail links. See our ethics statement.


DJI Mic 3 review: The DJI Mic Mini 2 in disguise
September 18, 2025
DJI Mic 3
Weight: 12g
The DJI mic lineup has consistently put out some of the best content creator mics. Not only do they sound good, they’re small, easy to use, and versatile. With the DJI Mic 3, it’s even smaller, with a slew of new features that make content creation easier. However, it feels like two steps forward and one step back. It’s better than the first DJI Mic and the DJI Mic Mini, but worse than the DJI Mic 2. This places the DJI Mic 3 in a tricky middle ground with some serious trade-offs. Is it going to be a better or worse experience for you? Read our review to find out.
This article was published on September 18, 2025, and this is the first version of the article. Updates will follow as the market changes.
The DJI Mic 3 is for run-and-gun content creators who want hands-free, high-quality audio with features that reduce post-production time.
What’s it like to use the DJI Mic 3?
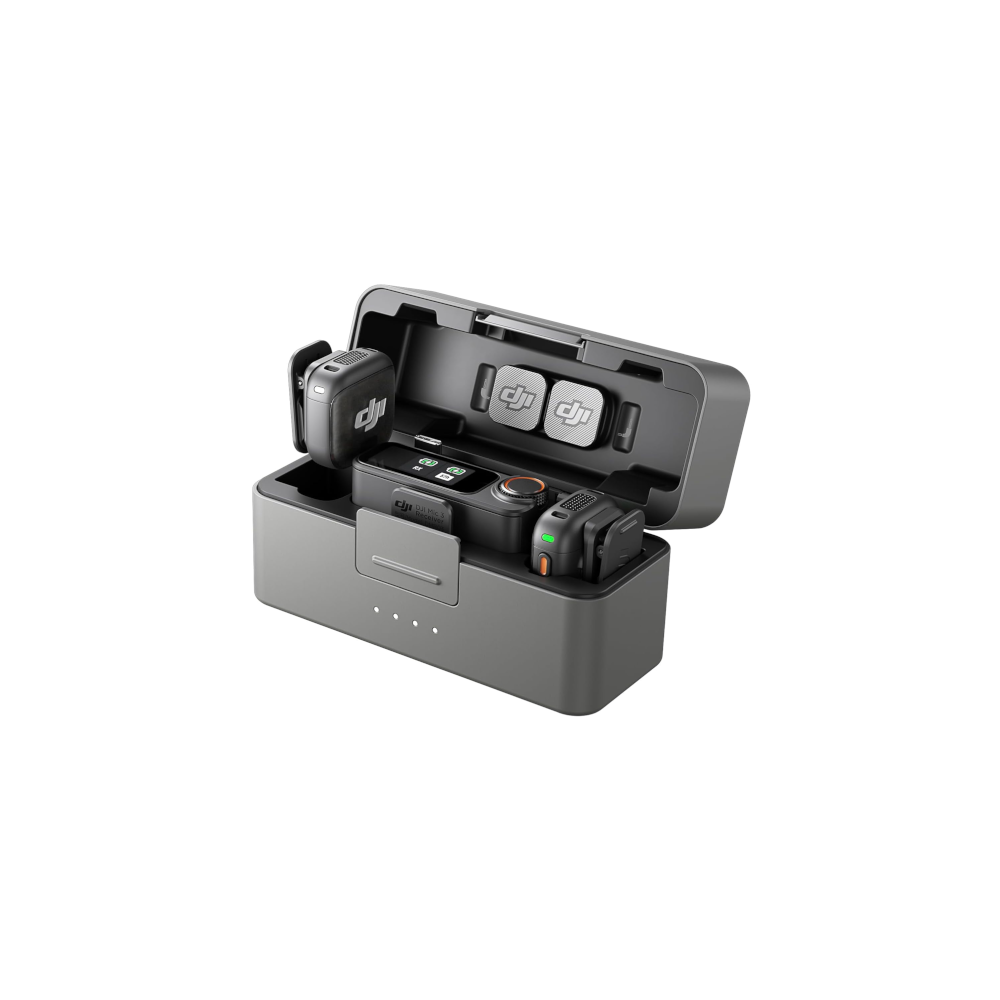
The DJI Mic 3 comes with a soft shell carry case for the DJI MIC 3’s hard shell case. Yes, there’s a case for your case. That aside, the soft shell carry case isn’t bad. It’s a great way to store the extra accessories you don’t need for capturing audio. I use it to store the included USB cable, camera adapter, and extra wind protection. It helps that it can easily fold to take up less space in your bag if need be.
The hard-shelled charging case can now hold every accessory, unlike previous versions. It houses and charges both microphones with the wind muff installed, their magnetic buttons and clips, the receiver, the 3.5mm to 3.5mm cable, and the USB-C connector. Unlike previous iterations, the Apple Lightning port adapter is no longer included. Not much of a problem as we’ve had USB-C iPhones for two generations now. But it would have been nice to have it included.

The transmitters are incredibly small, with two buttons on the side. They can be attached to clothing via a magnetic button or clip. The downside of this change is that the transmitters lose the 3.5mm jack. There is also no USB connection. This means you’re entirely reliant on the case to charge and access recordings. For most content creators, losing the USB and 3.5mm connections will not be an issue. However, for those who require a way to connect a lav mic without spending thousands of dollars on a UHF microphone pack, these are an instant skip.
Despite being easier to hide, the logos are terribly obvious. The magnetic buttons and transmitter face are bright, and DJI’s logo stands out almost too annoyingly. DJI seems to ensure you know which mic your favourite content creator uses. We already see a lot of content creators use the wireless lav as a handheld microphone. Having a mic on screen isn’t an issue. It’s those times when having a glaring logo is unacceptable that make it distracting. While it’s easy to hide, it’s not as easy compared to a lav mic. In commercial shoots or documentary work, having visible logos is not allowed.
The good part is that the microphone transmitters are well-built. The wind cover is easy to insert, and the recording lights are easy to read. One of the transmitters we received didn’t have LEDs that worked. It was confusing, and I was not able to tell if the mic was on or recording internally. However, there are vibration motors that notify you if you have completed an action. This is great since you’ll always be aware if you accidentally pause the recording.
The receiver is slightly smaller than the previous version. There is a locking 3.5mm connector and a headphone out. The menu is improved in my opinion with a slightly cleaner look. It clearly shows which transmitters are connected and the volume. Checking if the mic is recording is easy. The transmitter turns red in the menu. This is good if the mic is in a spot you don’t want to disturb, such as the inside of a bra. Enabling and disabling almost all features on the receiver is possible without having to connect to the app. At least that’s what I thought I would be able to do.
Out of the box, there is a constantly annoying notification that suggests using the DJI MIMO app. This happens every time I turn it on. I was not able to get rid of this without connecting to the app and updating the firmware. I hate devices that pester me to connect to an app before I use a product. DJI has a horrible track record with its software, and at the launch of the DJI 3, it’s still horrendous.
The DJI Mimo App can be a pain to use
Connecting to the app was hit or miss. When connecting via USB, it would sometimes disconnect when I slightly bump the receiver. Using the wireless link, the microphones disconnect, leading to being unable to control the microphone settings.
The first page of the DJI MIMO app is a cluttered mess of advertisements for a product you have already bought. This is ridiculous, and companies should stop doing this. I already bought the product, and you want to force advertising down my throat? It gets even worse. Other than the advertisements, I see that there is a “course” on how to use the DJI Mic 3. Fair enough, less boring than calling it instructions. To view any video, the app asks me to log in to “save my learning progress”. NO! This would have been acceptable if this were a single-time ask. It happens every time I move to another video.
That’s not the end of my gripes with the DJI MIMO app. When opening the app, you get greeted with automatic scrolling advertisements. This is followed by the Academy, which provides instructions on how to use a product. At the bottom is the DJI store, just in case those adverts on the top worked. If you scroll down, you get shot guides and featured videos that use DJI products. Why aren’t the settings for the DJI Mic 3 the first thing you see?
Granted, it does ask for permission to open the DJI MIMO app every time you connect the receiver to the phone. Only to then ask if I want to set the microphone or connect another device. If you do exit out of the app, the settings seem to disappear. Finding the settings for the microphone is confusing. It’s located at the bottom of the screen, as a button that resembles a voice recording start button. After pressing the button, it still asks if you want to connect to another device. Selecting the “go to settings” will allow access to the features of the DJI Mic 3.
Accessing both transmitter and receiver settings are available in the DJI MIMO app. It’s the same features available through the menu on the receiver itself, but with an easier-to-use interface. Even here, the menu is cluttered. Half of the features are hidden behind the three-dot menu, colored gray on a black background in the corner. For some reason, in the DJI Mic 3 settings, it tells you in text that you’re using the DJI Mic 3 RX, the DJI Mic 3 TX1, and the DJI Mic 3 TX2. Instead of this, it’s clearer and less cluttered to have a picture with a number as an indication. There’s also no need to hide the options, such as “32-bit float,” in a full-sized app. If there was a setting that should be hidden, it’s the “format” option. The option to completely wipe all the data from the internal storage shouldn’t be in the middle of the menu. This should be a way to check remaining storage as indicated by the hours next to the option.
My issues with the DJI MIMO app aside, it does work as a really good control panel. It’s easy to access timecode, audio channel settings, voice tone settings, and remotely mute or trigger internal recording.
DJI Mic 3 features
There are a few pain points that aren’t easily apparent when using the DJI Mic 3. The 32-bit float recording is not enabled by default. Given the amount of marketing with the 32 bit-float, you would think this would be the default. This is not a problem with the automatic gain feature. Where, if you lower or raise your voice. Increasing the gain for quiet voices or reducing the gain for loud voices. If the “automatic gain” feature is set incorrectly, the gain is adjustable. The gain can be adjusted independently for each mic. The output coming from the receiver can also be adjusted.
The DJI mic 3 can use “voice tone” adjustments to make voices sound more pleasing. There’s “Bright,” which boosts some of the treble and mids. The opposite is “Rich,” which boosts some of the Bass and slightly reduces the treble. I don’t personally use this as it is a simple EQ, which I would rather have control of in post. However, with “Dual file 32-bit float internal recording,” this is mitigated. It’s the ability to record both the original and the processed version of the recording.

Mic over shirt with wind protection. The naming of “Dual file 32-bit float internal recording” makes it seem that both files would be in 32-bit. Unfortunately, only the processed audio is recorded in 32-bit float. The unprocessed audio is a regular 24-bit file. This is still a great amount of flexibility, but it would be better to have more data on the unprocessed audio instead. Having both files will take up a lot of space quickly. Although it is good to know you can fall back to the unprocessed audio if required.
When the internal storage runs out of space, by default, it does “Loop Recording”. The mic will override the earliest audio with the current audio. This can become a problem when used in a podcast setting. However, it’s unlikely that many will go over 21 hours of total record time, with “Dual file 32-bit float internal recording”. You’re likely to be limited by the 8-hour battery life.
When recording for long periods of time, it’s possible to get audio drift. This audio delay can be as small as one frame of video behind, which is as small as 0.0167 seconds. Audio drift is where the audio becomes out of sync over a long period of time, which can stack up to a very noticeable delay. The inclusion of timecode to sync makes it easier to sync the video and audio. Timecode can take some time to set up, but when doing multi-hour shoots, the tool to properly sync audio is available.
How do you control the DJI Mic 3?
You can control the microphone from the DJI MIMO app, the receiver, and the microphone transmitter itself.

For those who are new, navigating through the menus on the receiver is difficult. This is mostly due to having all the features accessible through the receiver. There are two methods for using the receiver as a controller: the push-button dial and power button combination, and the screen as a touch screen. The dial is smooth with large tactile bumps. Pressing down the button creates a clicking sound, which makes me prefer to use the touch screen.
There are two sections to change the transmitter and receiver settings. Swiping down will show device setting options, such as receiver, transmitter, device linking, device management, time code, and app connections. Selecting the microphone, on the other hand, will allow you to adjust the recording settings. This includes starting and stopping the internal recording, muting the microphone, adjusting the noise canceling level, and adjusting the voice tone.
Some of the recording settings are also accessible through the transmitter itself. Double-tapping the power button will enable or disable noise cancelation. The transmitter can only toggle between off and the previous noise cancelation setting. Pressing the power button once will start internal recording. If the transmitter doesn’t automatically turn on after being removed from the case, holding the power button for two seconds will turn it on and vice versa. The link button can be used to connect to other receivers.
How does the DJI Mic 3 connect?
There are many options to connect to the DJI Mic 3 transmitters. As listed below:
- Locking 3.5mm
- USB-C or Lightning connector
- Hotshoe mount for Sony cameras with the camera adapter.
- Bluetooth connection.
The easiest way to connect the microphones to your recording device is the 3.5mm connection. This is the standard connection when connected to a digital camera. When using the camera adapter, currently, the only supported camera brand is Sony. When using the USB-C connection, I could connect to Android, iOS, Windows, and macOS. Unless connected to a device that records in 32-bit float, the audio will depend on the audio recording settings. 32-bit float recordings are available through the internal recordings of the DJI Mic 3.
Other than the two microphone transmitters from the DJI Mic 3, the receiver can connect up to four transmitters. The DJI Mic 3 can also connect to three other receivers to create a group.
No, the microphone has internal batteries to power themselves.
How does the DJI Mic 3 sound?
The DJI mics sound slightly muffled when used directly; there is some underemphasis in the treble when used this way. The sound from six inches away held in front of the subject sounds quieter than when clipped to the chest. The DJI Mic 3 sounded the most natural when directly clipped in the middle of the chest.
When doing tests in an untreated room, the mic does a good job of rejecting the reverb of the room. The reverb doesn’t feel intrusive and can be easily ignored. When using the noise canceling in a noisy environment, you still get a bit of the robotic fluctuation. The more noise there is in the environment, the more it is canceled out. When set to basic, the robotic fluctuations aren’t easily noticeable. The noise cancelation in “basic” reduces the loudness of the background noise, while keeping my voice at the same volume. When set to “strong,” the robotic fluctuations are easily noticeable but easily ignorable compared to very loud noises in the background. This attempts to remove all background noise and does a very good job.
DJI Mic 3 held 3 inches away :
DJI Mic 3 held 6 inches away:
DJI Mic 3, middle of chest 6 inches away:
DJI Mic 3, middle of chest underneath the chest, 6 inches away:
DJI Mic 3 held at 3 inches away with noise canceling basic:
DJI Mic 3 held at 3 inches with noise canceling basic:
DJI Mic 3 held 3 inches away:
DJI Mic 3 held 6 inches away:
DJI Mic 3, middle of chest, 6 inches away:
DJI Mic 3 underneath shirt 6 inches away:
DJI Mic 3 held at 3 inches away with noise canceling basic:
DJI Mic 3 held at 3 inches with noise canceling basic:
Should you buy the DJI Mic 3?

The DJI MIMO app is horrendous and practically begs you to buy another DJI product. Despite that, the DJI Mic 3 is a convenient and versatile solution for capturing audio. You get good audio, with time-saving features for vlogging or any on-the-go activities. It fits in with the DJI ecosystem, so if you already have DJI cameras, it easily pairs with them. If recording with a smartphone, you can even connect the mic directly via Bluetooth. This makes the DJI a great option for content creators who aren’t looking to go into corporate work.
What should you get instead of the DJI Mic 3?

As a cheap wireless mic for smaller studios doing commercial work, consider a lav mic in combination with the DJI MIC 2 instead. As small as the DJI Mic 3 is, there is too much branding and attention for certain types of corporate or documentary work, in comparison to a well-placed and hidden lav mic. The DJI Mic 2 could easily be used for a decent backup to an ENG kit.

DJI Mic 3 review: FAQs
No, the DJI Mic 3 do not have a water resistance rating.
Yes, the DJI Mic 3 can connect through Bluetooth. Reminder: only the internal recording is 32-bit float.
Yes, the DJI mic 3 receiver can be connected through the USB-C port. The DJI Mic 3 comes with a USB adapter. However, they no longer include a lightning port adapter for the iPhone 14 or older.
Yes, the DJI Mic 3 can be connected in multiple ways. 3.5mm jack, Bluetooth, USB-C, and the DJI camera adapter. The camera adapter only supports Sony cameras at the time of writing.
Thank you for being part of our community. Read our Comment Policy before posting.